
You’ve already built your website in v0.dev.
The design is done. The sections are in place. The site looks the way you want.
Now you want to move it to WordPress — without opening a page builder and rebuilding the entire thing from scratch.
In this tutorial, we’ll show you how to take an existing v0.dev website and use PressMeGPT to recreate it as a WordPress theme using AI.
The process is straightforward:
Publish your v0.dev site → Copy the URL → Import it into PressMeGPT → Generate your WordPress theme → Refine it → Export and install it.
Here’s how to do it.
Step 1: Publish Your v0.dev Website
Start with the v0.dev project you want to convert.
Before moving it to WordPress, make sure the version you want to use is publicly accessible.
Take a quick look through the website and check that the main design is ready — especially the header, hero section, images, content sections, buttons, and footer.
It’s also worth checking the mobile version now. The cleaner the source design is, the easier it is to compare your WordPress version later.
Once everything looks good, publish the v0.dev website and copy its public URL.
This is the URL you’ll use inside PressMeGPT.
Step 2: Import the v0.dev Website Into PressMeGPT
Go to PressMeGPT.com and sign in to your account.
If you don’t have an account yet, create one and verify your email to access the dashboard.
Once you’re inside, click:
New Project → From Website
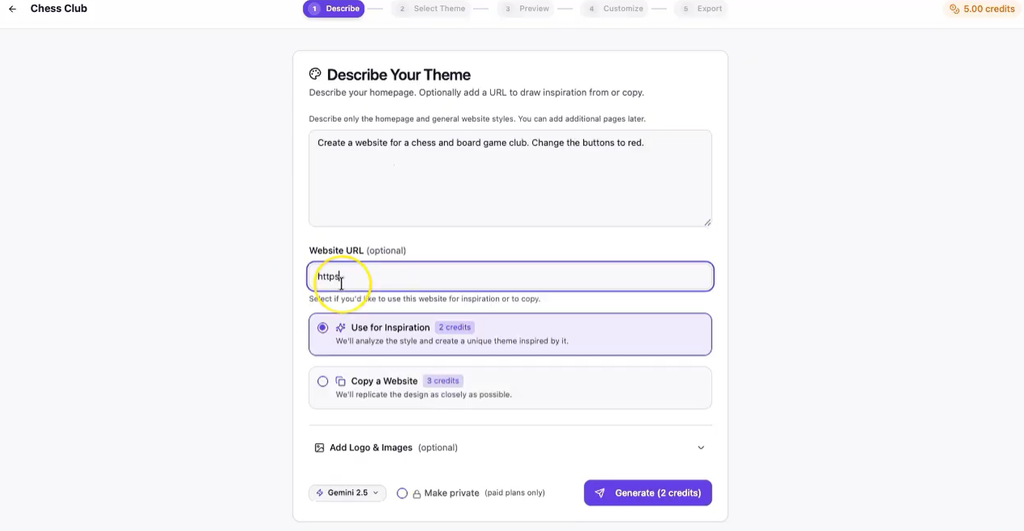
Paste the public URL of your v0.dev website into the website field.
Instead of asking you to manually describe the design from scratch, PressMeGPT can use the existing site as the starting point.
It analyzes the visual structure of the page, including things like:
- – Sections and layout
- – Typography
- – Colors
- – Spacing
- – Buttons
- – Images
- – Content hierarchy
- – Overall visual styling
If you simply want to recreate the existing design, you can keep your additional instructions minimal.
If you already know you want something changed in the WordPress version, you can include that too.
For example:
“Recreate this design, but make the header more compact.”
Or:
“Keep the layout the same, but increase the width of the main content area.”
Once the URL and instructions are ready, continue to generate the theme.
Step 3: Generate the WordPress Version
Click Generate Theme and let PressMeGPT recreate the v0.dev design as a WordPress theme.
This is the part that replaces a lot of the repetitive work normally involved in a manual migration.
Without a conversion workflow, you would typically need to open WordPress and rebuild the design section by section — recreating containers, columns, typography, spacing, buttons, backgrounds, and responsive behavior.
Instead, PressMeGPT uses the existing v0.dev website as the visual reference and generates the WordPress version for you.
Once generation is complete, open the result and compare it with the original site.
Don’t worry if you spot something you want to adjust. That’s what the next step is for.
Step 4: Refine the Design With AI
This is where you can bring the WordPress version closer to the original v0.dev design.
Open your original site in one tab and the generated version in another.
Compare the areas that have the biggest visual impact:
- – Header and navigation
- – Hero section
- – Heading sizes
- – Fonts
- – Button styles
- – Section spacing
- – Backgrounds
- – Images
- – Column widths
- – Mobile layout
If something needs adjusting, describe the change in plain language.
For example:
“Reduce the space above the hero heading.”
“Make the CTA button larger and give it more rounded corners.”
“The second section should have three equal columns.”
“Make the heading size closer to the original website.”
“Stack these cards vertically on mobile.”
A useful approach is to make focused changes rather than putting ten different fixes into one prompt.
Fix the most noticeable difference, review the result, and then move to the next one.
This makes the refinement process much easier to control.
Step 5: Preview the WordPress Theme
Before exporting, go through the site one more time.
Check the desktop version first, then test the responsive layout.
Look specifically for small things that are easy to miss during the initial conversion:
- Are the sections the correct width?
- Do the fonts feel right?
Are the buttons consistent?
Is the navigation easy to use?
Are images displaying at the correct size?
Does the layout still work on a smaller screen?
The goal does not have to be pixel-for-pixel perfection. The important thing is that the WordPress version preserves the design and experience of the v0.dev site without requiring you to manually rebuild the entire layout.
If you notice a problem, refine it before exporting.
Step 6: Export Your WordPress Theme

Once you’re happy with the result, export the theme from PressMeGPT.
You’ll receive the WordPress theme file that you can upload to your WordPress installation.
Keep the theme ZIP file intact.
There’s normally no reason to extract it before uploading because WordPress can install the ZIP directly from the dashboard.
Now you’re ready to move from PressMeGPT to your actual WordPress website.
Step 7: Install the Theme in WordPress
Log in to your WordPress dashboard.
Go to:
Appearance → Themes → Add Theme → Upload Theme
Choose the theme ZIP file you exported from PressMeGPT and click Install Now.
Once installation is complete, you can preview the theme first or activate it.
If you’re replacing the theme on an existing live website, previewing or testing it on a staging site first is a good idea.
If it’s a new WordPress installation, you can activate the theme and begin checking the site immediately.
And that’s it.
Your v0.dev design is now running as a WordPress theme.
Check the Site After Conversion
Before calling the migration finished, spend a few minutes testing the WordPress version.
Click through the navigation and make sure every important link goes where it should.
Check your images.
Test buttons and calls to action.
Open the website on a phone.
Check the header and footer.
If you have forms, make sure they actually submit correctly.
It’s also worth checking the site on a few different screen sizes. A design that looks perfect on a desktop monitor can still need small responsive adjustments.
If you notice a visual issue with the converted theme, you can return to PressMeGPT, make the change, and export an updated version.
What About React Features and App Functionality?
There is an important difference between converting the design of a v0.dev website and converting all of its application logic.
If your v0.dev project is primarily a marketing website, landing page, portfolio, company site, or other content-focused website, the migration is much simpler.
But v0.dev can also be used to create more advanced interfaces and applications.
If your project contains features such as:
- – User authentication
- – Dashboards
- – Database connections
- – API integrations
- – Complex React components
- – Dynamic application logic
- – Payment functionality
- – Advanced forms or workflows
those features may need to be recreated separately using WordPress plugins, APIs, or custom development.
For example, PressMeGPT can recreate the design of a dashboard, but if that dashboard is pulling account data from an external database, that backend functionality still needs to be connected inside your WordPress setup.
So think of the conversion in two parts:
Design and layout → PressMeGPT
Custom application functionality → WordPress plugins, integrations, or development as required
For a typical website, most of what you actually want to preserve is the visual design — and that’s where this workflow can save a significant amount of time.
From v0.dev to WordPress Without Rebuilding Everything
If you already have a v0.dev website you like, you shouldn’t have to start from a blank WordPress page just because you want to change platforms.
With PressMeGPT, the workflow is much simpler:
1. Publish your v0.dev website
2. Copy the public URL
3. Create a new project in PressMeGPT and choose From Website
4. Paste the v0.dev URL
5. Generate and refine the WordPress theme
6. Export the theme
7. Upload and activate it in WordPress
You get to keep the design direction you already created in v0.dev while moving the website into WordPress without manually rebuilding every section.
If your v0.dev project is already live, you already have what you need to get started.
Visit PressMeGPT.com, create a new project, paste your website URL, and turn your existing design into a WordPress theme.